 Manufacturer’s
notes:
Manufacturer’s
notes:LOS Bulletin No 14 (April 1978)
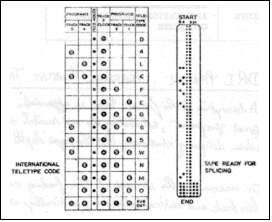
The [five-track paper] tape provides two separate format “programs”, selected by the red switch on the paper feed unit (but remember when designing stationery that the paper depth must be the same on each program!).
On account of the slowness of line-feeding on the DRI (and on most other printers too), form feeds and vertical tabs are practically essential and a format tape will normally need to be designed for each type of stationery at an installation.
 Manufacturer’s
notes:
a) By making use of one or all three of the idler pulleys, a wide range of tape lengths can be accommodated.
b) The tape may contain several identical programs in sequence.
c) The total number of lines of a tape should be an exact multiple of the number of lines on a form, in order to maintain synchronism between the tape and the forms.
d) Tracks 2 and 5 contain start holes.
e) Tracks 1 and 4 contain stop holes.
f) A FF movement finishes at the line containing a start and a stop hole. This should coincide with the first line of print.
g) A LF movement to a line with a start hole causes a VT movement to the next line with a stop hole.
h) A VT movement ends at the next line with a stop hole.
i) Tapes should end in five to ten lines perforated in every channel for splicing purposes. It is convenient to treat the beginning of the tape in a similar manner to define the first line of the program and subsequently to trim to the beginning.
j) When splicing, trim the corners. Use flexible waterproof adhesive, and ensure that the leading edge is underneath, to prevent its being pulled up by the brushes. Check that all holes are free of adhesive.
Since the printer will accept eight-track tape, format loops may be mass-produced if a paper tape punch attachment is available. A “stand-alone” utility is available within LOS for this purpose as follows:
Bootstrap as usual but leave SWITCH 7 UP when CONTINUE is pressed.
Set the switches to the number of loops to be punched.
STANDARD 66-line loops: At the station which displays OP?,
enter 6/0200H. The required number of
loops will be punched at punch device code 33
(station returns to OP?).
BLANK 66-line loop (i.e. Tracks
3 and 8 only punched on all 66 lines): Enter 6/0220H.
USER-DESIGNED loops:
Enter 6/0401A and load required parameters into core as follows:
B17
1 if this is the last parameter,
0 otherwise.B16:B9
Number of ordinary lines (tracks 3 and 8 punched) preceding this pattern.
B8:B1
Pattern to be punched in this line.
Important: B8 is the parity bit and is not under programmer control. Since it must be punched in every line, it is necessary to set or clear B7 so as to achieve even parity.Press ESCAPE (station returns to OP?).
Enter 6/0400H to punch the loops.